

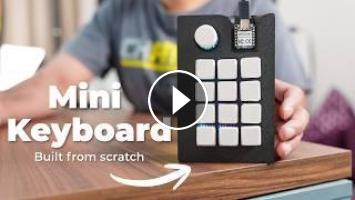
I built a custom 12-key RGB macropad from scratch to improve my workflow and in this video I show you exactly how to do it yourself!
WHAT'S IN THIS BUILD:
- Seeed XIAO RP2350 microcontroller
- 12 mechanical switches with hot swap sockets
- RGB LED strip underglow
- EC11 rotary encoder with button
- 3D printed casing
FULL COMPONENT LIST:
- Seeed XIAO RP2350 — [https://www.seeedstudio.com/Seeed-XIAO-RP2350-p-5944.html]
- MX mechanical switches x12 (translucent housing) - Any desired switches
- Kailh hot swap sockets x12 — [https://link.amazon/B0iCB6mYN]
- 1N4148 diodes x12 — [https://link.amazon/B0befhOAz]
- EC11 rotary encoder + knob — [https://link.amazon/B00MZf1II]
- WS2812B LED strip IP30 DC5V 60LED/m (BTF-LIGHTING) — [https://link.amazon/B03H96MK8]
- 470 ohm resistor x1 — [https://link.amazon/B0bQj0CNl]
- Perfboards — [https://link.amazon/B04N7fsRr]
- Jumper wires
- Translucent PLA or PETG filament
- M3 screws and heat set inserts (if needed)
- USB-C data cable
CODE:
https://github.com/saaqib-m/SeeedXiaoMacropad/blob/main/code.py
TIMESTAMPS:
0:00 Intro
1:36 Components
3:24 Electrical circuit
5:42 Breadboard testing
7:59 Soldering
11:35 3D model design
13:39 Assembly
Tag me in your build - I'd love to see it!
#mechanicalkeyboard #diy #raspberrypi #davinciresolve #3dprinting #rgbkeyboard #electronic #electronics #soldering
WHAT'S IN THIS BUILD:
- Seeed XIAO RP2350 microcontroller
- 12 mechanical switches with hot swap sockets
- RGB LED strip underglow
- EC11 rotary encoder with button
- 3D printed casing
FULL COMPONENT LIST:
- Seeed XIAO RP2350 — [https://www.seeedstudio.com/Seeed-XIAO-RP2350-p-5944.html]
- MX mechanical switches x12 (translucent housing) - Any desired switches
- Kailh hot swap sockets x12 — [https://link.amazon/B0iCB6mYN]
- 1N4148 diodes x12 — [https://link.amazon/B0befhOAz]
- EC11 rotary encoder + knob — [https://link.amazon/B00MZf1II]
- WS2812B LED strip IP30 DC5V 60LED/m (BTF-LIGHTING) — [https://link.amazon/B03H96MK8]
- 470 ohm resistor x1 — [https://link.amazon/B0bQj0CNl]
- Perfboards — [https://link.amazon/B04N7fsRr]
- Jumper wires
- Translucent PLA or PETG filament
- M3 screws and heat set inserts (if needed)
- USB-C data cable
CODE:
https://github.com/saaqib-m/SeeedXiaoMacropad/blob/main/code.py
TIMESTAMPS:
0:00 Intro
1:36 Components
3:24 Electrical circuit
5:42 Breadboard testing
7:59 Soldering
11:35 3D model design
13:39 Assembly
Tag me in your build - I'd love to see it!
#mechanicalkeyboard #diy #raspberrypi #davinciresolve #3dprinting #rgbkeyboard #electronic #electronics #soldering
- Категория
- Схемы по заработку в интернете

Комментариев нет.
Следующее
Auto
-
13:12

6 DIY Facebook Pages You Can Model With AI & Affiliate Marketing
-
01:30
How I scaled my business from 30K a year to multiple six figures online, and how you can do it too…
-
17:01
I Built an UNCENSORED AI app For Hacking (and YOU can too)
-
14:19
the psychology of people who are too aware: 10 signs you're too alert, anxious, and afraid
-
00:32
Diy mini tractor video mini water pump science project machine #ytshorts #cartoon #tractor #diy
-
13:29
How I earn $10,000 a month with these EASY side hustles (and how you can too)
-
13:21
How I Make $300 A Day with Affiliate Marketing & You Can Too
-
01:55
How I made my first sales as an affiliate marketer and you can too #affiliatemarketing
-
19:47
Top 5 AI Tools I Am Using Today In My Business! (And How You Can Too)
-
06:05
I Made This Affiliate Marketing Business Completely Free || Here Is How You Can Too
-
05:33

ЗАРАБОТОК В ИНТЕРНЕТЕ | КРУТАЯ СХЕМА | FUNPAY
-
08:12

Пассивный Заработок 1000Р в День в Интернете на Телефоне Без Вложений
-
06:43

Как ЗАРАБОТАТЬ ШКОЛЬНИКУ в ИНТЕРНЕТЕ? Самые Легкие Способы Заработка
-
07:05

ЗАРАБОТОК В ИНТЕРНЕТЕ 2023 | Реальный заработок в интернете с вложением | Как заработать в интернете
-
05:49

ЗАРАБОТОК В ИНТЕРНЕТЕ 2023 | Реальный Заработок В Интернете С Вложением. Как Заработать В Интернете?
-
04:28

Схема заработка 2023 ! Зарабатываем в интернете онлайн сидя дома ! Заработок денег ! Деньги легко !
-
05:33

ЗАРАБОТОК В ИНТЕРНЕТЕ | КРУТАЯ СХЕМА | FUNPAY
-
06:43

Как ЗАРАБОТАТЬ ШКОЛЬНИКУ в ИНТЕРНЕТЕ? Самые Легкие Способы Заработка
-
14:53

Показываю Как Зарабатывать Деньги - Заработок В Интернете 2023 Рабочая Схема Для Заработка
-
14:12

Большой Заработок В Интернете С Выводом Рабочая Схема Заработка
 Загрузка...